 Chamomile is an annual. Chamomile is a member of the ragweed family, so it’s not recommended for anyone with moderate to severe ragweed allergies. An erect annual (Matricaria recutita), German Chamomile seeds are one of the few seeds that need light to germinate,
Also spelled Camomile, this herb is a native of Europe, and was brought by early settlers to North America.
Two main types of chamomile exist: German Chamomile and Roman Chamomile. The first is an annual that grows to about 2-3 feet, while the second is a perennial that grows to be about 4-12 inches. Both varieties of chamomile reseed themselves, so you don’t need to plant too often.
PLANT TYPE: Perennial (Chamaemelum nobile), Annual (Matricaria recutita)
SCIENTIFIC NAME: Perennial (Chamaemelum nobile), Annual (Matricaria recutita)
ZONE / HARDINESS: 3 to 5 for perennial
MATURE PLANT SIZE: 9 inches high x varied width due to spreading
LIGHT: N/A
FLOWERING PERIOD: June to August
SOIL TYPE: Light, dry soil
pH RANGE: 7.0
KNOWN PESTS: None
KNOWN DISEASES: None
Water Requirements
Water on a regular schedule, taking care to not overwater.
Potential Pests & Diseases
Aphids, mealybug. Minimal disease issues.
Special Notes
Chamomile may be considered a noxious weed or invasive plant in some areas. Chamomile is known to attract bees, butterflies or birds and has fragrant blossoms. Chamomile self-sows freely; remove flowers (deadhead) if you do not want volunteer seedlings the following season.
Growing German Chamomile
Growing Cultures
Outdoors, containers, landscaping, mass plantings. German chamomile not recommended for containers.
Plant Height
Chamomile grows to a height of 20 to 30 inches (50 – 70cm).
Plant Spacing
Chamomile plants should be spaced 6 inches (15 cm) apart.
Preferred pH Range
Chamomile will grow in a relatively wide pH range between 5.6 (acidic) and 7.5 (neutral).
Propagation
From seed. Direct sow in spring or fall. Fall sown seeds germinate following spring. Seeds need light to germinate.
Seed Germination Period
7 to 14 days.
Seeds Per Gram (Approximate)
10,000 to 18.000.
Soil Requirements
Well drained, poor to average soil.
Alternative Growing Media
Soilless potting mixes, perlite, vermiculite, rockwool, coco peat, Oasis foam.
Time From Seed to Saleable Plant
Seeds to finished plugs, 6 weeks; plugs to saleable plants, 6 to 6 weeks.
Sun & Lighting Requirements
Chamomile grown outdoors prefers full sun but will tolerate some shade.
Growing Chamomile
Buy healthy, green plants with no signs of wilting or disease. Plants should be stocky with plenty of leaves. It’s actually a plus if they don’t have any flowers – they’ll divert their early energy into root development rather than flowering.
It also needs light to germinate. Scatter the seed on top of the potting soil and press down.
Choose a site in full sun with average to rich, well-drained soil.
Plant seedlings in spring or mid fall, spacing them 6 inches apart for a carpetlike ground cover effect, or 18 inches apart in herb and flower gardens.
Keep soil evenly moist. Mulching is a good idea.
Trim faded flowers or shear the plant occasionally to promote new blooms.
Fertilize every four to six weeks, or work in a slow-release fertilizer at planting time.
Tear out faded annual types of chamomile at the end of the season, once frost fells them. Cut back perennial types to just 2 or 3 inches.
Chamomile comes in both annual (grows just once a year) and perennial (returns year after year) types. German chamomile (Matricaria recutita) is the annual type; Roman chamomile (Anthemis nobilis) is the perennial type.
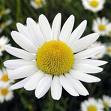
Growing just 3 to 9 inches high, chamomile spreads about 24 inches, making it useful as a ground cover as well. It covers itself from early to mid summer in pretty yellow and white flowers, which can be made into chamomile tea – reputed to soothe upset stomachs and digestive systems as well as calm the nerves.
Chamomile also likes its soil moist but not wet and does well between pavers and stepping-stones.
Chamomile performs well where temperatures in summer do not regularly reach 100 degrees F.
I have German chamomile and beware. It grows and spreads like a weed. The seeds even spread into your lawn and start growing. Still a gorgeous herb.
Chamomile tea has a subtle herbal taste and is famously used as a sleep aid and to calm upset stomachs. Two types of chamomile are commonly planted in herb gardens: German chamomile (Matricaria recutita), a robust annual that grows to about 2 feet tall and Roman chamomile (Chamaemelum nobile), a petite perennial. When growing chamomile for tea, use German Chamomile which produces an abundance of apple scented, daisy-like flowers. Here is how to prepare it.
Plant German chamomile seedlings outdoors in spring after all danger of frost has passed in a spot with full sun and well-drained, fertile soil. One plant will produce about 3 to 6 cups of flowers (when dried), so plant accordingly. Seedlings are commonly available in spring at well-stocked nurseries or you can see Resources below for a mail order source of seedlings.
The plant typically begins to bloom in mid-summer and continues blooming into fall. Pinch off the blossoms the day they open. These young flowers not only have the best flavor, by removing them you also encourage the plant to bloom more. Get in the habit of checking for new blooms once a day and harvesting them. From my experience, 2 cups of fresh blooms dry down to about ¼ cup.
Immediately after harvest, bring the blossoms indoors and spread them out in a single layer on craft paper. Dry the blossoms in a spot that is indoors, warm and out of direct sunlight.
Allow the blossoms to fully dry (they should crumble easily when rubbed between your fingers). When dry, place them in a glass jar with a lid or in a brown paper bag. Store the chamomile in a dark, cool spot for up to one year.
To prepare tea, pour 8 oz. of boiling water over 2 tbsp. of dried chamomile blossoms. Allow the blossoms to steep for 4 to 5 minutes, then strain the tea into a tea cup. Add honey and a thin slice of lemon, if you like.
Chamomile readily self-seeds, so you will most likely only need to purchase seedlings once!
Harvesting Chamomile
Plan on harvesting chamomile in the morning sunlight after all the dew is gone. The plant should be completely dry! The flower part, petals and all, is what you are after. Flowers tend to open up in the morning and will close up when the sun begins to go down.
Shake the plant gently to remove any pests or debris.
There are two ways you can do this and each has it’s benefits:
(1) Pinch the flowers off at the stem or cut with gardening shears just below the flower head. Pinching the flowers will allow regrowth of the plant pretty quickly. Use this method if you want a continual harvest. Cutting only the flowers will require using a drying screen.
(2) Cut the stems with the flowers attached about 2-3 inches down the stem. Cutting the stems will take longer for the plant to rejuvenate, but you will be able to dry the chamomile by hanging it up in bunches with twine.
Either way, once you have the harvest, find a very warm area in your house or garage. Closets make a good choice. Make sure there is no moisture present and keep the chamomile out of sunlight. Any herb will turn moldy if these conditions are present. Dry, dark and hot is what you want. Check on the drying process frequently.
Once dried, if you chose to dry the herb by hanging it by the stem, now is the time to remove the flower only. Toss the stem. Place the chamomile in airtight dry glass containers and keep out of sunlight. It is best not to break apart the flower head until you are ready to use it. Keep as much of it intact as possible.