Summary
- direct sow two or three seeds, 1″ deep on small hill, 3 feet apart, when no chance of frost
- needs plenty of sun
- use compost mulch. keep 2 inches from plant base
- harvest fruit when 6 to 8 inches long
- use pruning shears to cut fruit when harvesting
- keep base of plant cleared of debris
- check once a week, under leaves, for squash bug eggs
- prolonged rainy weather or hot weather may produce less fruit (less bee activity)
- marigolds attract bees
Summer Squash
 Summer squash (also known as vegetable or Italian marrow), is a tender, warm-season vegetable that can be grown throughout the United States anytime during the warm, frost-free season. Summer squash differs from fall and winter squash in that it is selected to be harvested before the rind hardens and the fruit matures. It grows on bush-type plants that do not spread like the plants of fall and winter squash and pumpkin. A few healthy and well-maintained plants produce abundant yields.
Recommended Varieties
Summer squash appears in many different fruit shapes and colors:
Scallop or Patty Pan is round and flattened like a plate with scalloped edges, usually white but sometimes yellow or green.
Constricted neck is thinner at the stem end than the blossom end, classified as either “crookneck” or “straightneck” depending on if the stem end is straight or bent, and is usually yellow.
Cylindrical to club-shaped Italian marrows, such as zucchini, cocozelle and caserta, are usually shades of green, but may be yellow or nearly white.
The varietal selection of summer squash has markedly changed in recent years and the number of varieties offered has greatly expanded as the result of new interest, hybridization and introduction of disease resistance. The number of varieties is staggering. Recommended varieties of summer squash include:
Zucchini (Open Pollinated)
Black Zucchini (best known summer squash; greenish black skin, white flesh)
Black Beauty (slender, with slight ridges, dark black-green)
Cocozelle (dark green overlaid with light green stripes; long, very slender fruit)
Vegetable Marrow White Bush (creamy greenish color, oblong shape)
Zucchini (hybrid)
Aristocrat (All America Selection winner; waxy; medium green)
Chefini (AAS winner; glossy, medium dark green)
Classic (medium green; compact, open bush)
Elite (medium green; lustrous sheen; extra early; open plant)
Embassy (medium green, few spines, high yield)
President (dark green, light green flecks; upright plant)
Spineless Beauty (medium dark green; spineless petioles)
Golden Zucchini (hybrid)
Gold Rush (AAS winner, deep gold color, superior fruit quality, a zucchini not a straightneck)
Yellow Crookneck
Early Yellow Summer Crookneck (classic open-pollinated crookneck; curved neck; warted; heavy yields)
Sundance (hybrid; early; bright yellow, smooth skin)
Yellow Straightneck
Early Prolific Straightneck (standard open-pollinated straightneck, light cream color, attractive straight fruit)
Goldbar (hybrid; golden yellow; upright, open plant)
Scallop
White Bush Scallop (old favorite Patty Pan type, very pale green when immature, very tender)
Peter Pan (hybrid, AAS winner, light green)
Scallopini (hybrid, AAS winner)
Sunburst (hybrid, bright yellow, green spot at the blossom end)
Other
Butter Blossom (an open-pollinated variety selected for its large, firm male blossoms; fruit may be harvested like summer squash, but remove female blossoms for largest supply of male blossoms)
Gourmet Globe (hybrid; globe-shaped; dark green, with light stripes; delicious)
Sun Drops (hybrid, creamy yellow, unique oval shape, may be harvested as baby with blossoms attached).
When to Plant
Plant anytime after the danger of frost has passed, from early spring until midsummer. Some gardeners have two main plantings – one for early summer harvest and another for late summer and fall harvest.
Direct-seeding is the preferred method for starting squash. Use a soil thermometer and sow seeds after the last frost date, once soil has warmed to 70° F at the 2-inch depth.
Spacing & Depth
Starting from Seed
Soak the zucchini seeds that you are going to plant in some clean, warm water for eight hours.
Sow two or three seeds 24 to 36 inches apart for single-plant production, or four or five seeds in hills 48 inches apart. Cover one inch deep then water. I like to water the seeds for the next three days, unless there is rain. When the plants are 2 to 3 inches tall, thin to one vigorous plant or no more than two or three plants per hill.
Planting the Seeds
Zucchini seeds can be planted in a large container with more than one seed. Or you can use individual, smaller containers. The container is filled with your homemade dirt or you can purchase some potting soil at the garden center of your local home improvement store. The seeds need to be placed about an inch from the top of the soil and covered.
Water the soil generously the first day and then every few days after. The container should have holes in the bottom and be set in a water catch. Zucchini likes well-drained soil, but it will tolerate a damp soil especially when it is young. The plants also like a lot of sun, so make sure to set them in a sunny window or an enclosed porch. After your plants have germinated and you have some leaves beginning, you can plant it outdoors, weather permitting. If the plants are in a large enough container, they can actually stay in these and grow to full size. They should be fully grown and ready to pick in 45 to 50 days. You can leave them longer and grow larger zucchini but they are tougher and not as tasty.
Care
Any well-drained garden soil produces excellent yields of summer squash. Certain mulches increase earliness and yields, because the roots are shallow. Keep mulch 1 to 2 inches from plant base. Use 2 inches of fine mulch.
Harvesting
Because summer squash develop very rapidly after pollination, they are often picked when they are too large and overmature. They should be harvested when small and tender for best quality. Most elongated varieties are picked when they are 2 inches or less in diameter and 6 to 8 inches long. Patty Pan types are harvested when they are 3 to 4 inches in diameter. Slightly larger fruit may be salvaged by hollowing out and using them for stuffing. These larger fruits may also be grated for baking in breads and other items. Do not allow summer squash to become large, hard and seedy because they sap strength from the plant that could better be used to produce more young fruit. Pick oversized squash with developed seeds and hard skin and throw them away. Go over the plants every 1 or 2 days. Squash grow rapidly; especially in hot weather and are usually ready to pick within 4 to 8 days after flowering.
Although summer squash has both male and female flowers, only the female flowers produce fruits. Because the fruits are harvested when still immature, they bruise and scratch easily. Handle with care and use immediately after picking. Be careful when picking summer squash, as the leafstalks and stems are prickly and can scratch and irritate unprotected hands and arms. Use a sharp knife or pruning shears to harvest and wear gloves if possible. Some gardeners also pick the open male and female blossoms before the fruits develop. Especially the female blossoms, with tiny fruit attached, are a delicacy when dipped in a batter and fried.
Common Problems
Cucumber beetles attack seedlings, vines and both immature and mature fruits. They can be controlled with a suggested insecticide applied weekly either as a spray or dust. Be alert for an infestation of cucumber beetles in early September because these beetles can damage the mature fruits.
Squash bugs attack vines as the fruit begin to set and increase in numbers through the late summer, when they can be quite damaging to maturing fruit. They hatch and travel in groups, which seem to travel in herds until they reach maturity. Using the proper insecticide when the numbers of this pest are still small minimizes damage. The eggs congregate under the leaves in neat rows, usually starting in June.
Lack of Fruit
All squash plants are monoecious, which means there are separate male and female flowers on the same plant. A less common reason for zucchini fruit falling off a plant is blossom end rot. The tell tale signs of this are blacked ends on the stunted fruit. Blossom end rot is caused by lack of calcium in the soil.
Male Blooms
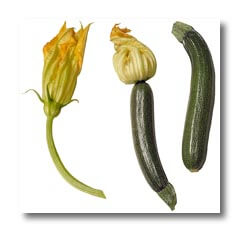
Unlike other common vegetables such as beans and peas, zucchini produces both male and female blossoms. Because the male blossoms appear first to attract bees, your zucchini plants may produce blooms for a week or more that do not set fruit. The male bloom contains the pollen necessary to pollinate the female blooms, but does not produce fruit on its own. Male blooms appear on a long slender stem. To ensure there is always plenty of pollen available, the plants produce many more male flowers than females.
Female Blooms
Female blooms appear several days to a week or more after the male blooms. These blooms contain a swollen ovary at the base of the bloom that looks like a miniature zucchini. These blooms must be pollinated before the young fruit can grow.
Pollination
Bees visit the male bloom where pollen sticks to their bodies. When they visit the female blooms, the sticky anthem inside the blossom attracts the pollen. When the pollen is deposited in the female bloom, the young fruit swells and begins to grow. If the female bloom is not pollinated, the flower shrivels and the tiny fruit drops from the vine.
Lack of Pollination
Sometimes, a lack of pollination occurs and the zucchini plant fails to produce fruit. This can occur for several reasons. Lack of bees due to environmental factors such as the use of pesticides that has killed beneficial insects, prolonged rainy weather, which reduces bee activity, or high temperatures which also inhibit bee activity and cause pollen to degrade. All contribute to lack of pollination. Humid and rainy weather causes pollen to clump.
Solutions
Hand pollinating your zucchini plants may be your only solution other than adding a beehive to your garden. Using a wet paintbrush to collect pollen from the male blooms and depositing it into the female bloom works well and typically solves the issue. Zucchini flowers tend to open up wide in the morning and are often closed by the afternoon so it is important to hand pollinate in the morning.
Questions & Answers
Q. Will summer squash cross with winter squash?
A. Summer squash varieties can cross with one another, with acorn squash and with jack-o’-lantern pumpkins. Cross-pollination is not evident in the current crop, but the seed should not be sown for the following year. Summer squash does not cross with melons or cucumbers.
Selection
Most people harvest summer squash too late. Like winter squash, summer squash is an edible gourd. Unlike winter squash, it is harvested at the immature stage. Ideally, summer squash should be harvested at 6 to 8 inches in length. Pattypan and scallopini are ready when they measure about 3 to 4 inches in diameter or less. Tiny baby squash are delicious too. Large rock-hard squashes serve a better purpose on the compost heap than in the kitchen.
Cut the squash from the vine using a sharp knife or pruning shears to avoid damaging the plant. Summer squash vines are very prolific, the more harvest the greater the yield. The most important characteristic to remember is that summer squash is best when immature, young and tender.
In this section, summer squash varieties will be limited to zucchini, yellow squash (crooked and straight), pattypan which is also call scalloped and scallopini. Because summer squash is immature, the skin is very thin and susceptible to damage. Handle with care. The average family only needs to plant one or two of each variety. Over planting usually leads to hoards of huge inedible fruit and/or scouring the neighborhood for people to take the surplus.
Storage
To store summer squash, harvest small squash and place, unwashed in plastic bags in the crisper drawer of the refrigerator. Wash the squash just before preparation. As with most vegetables, water droplets promote decay during storage. The storage life of summer squash is brief, so use within two to three days.
Squash Blossoms
Squash blossoms are edible flowers, raw or cooked. Both summer and winter squash blossoms can be battered and fried in a little oil for a wonderful taste sensation. Harvest only the male blossoms unless the goal is to reduce production. Male blossoms are easily distinguished from the female blossoms. The stem of the male blossom is thin and trim. The stem of the female blossom is very thick. At the base of the female flower below the petals is a small bulge, which is the developing squash.
Always leave a few male blossoms on the vine for pollination purposes. There are always many more male flowers than female. Harvest only the male squash blossoms unless you are trying to reduce production. The female blossom can be harvested with a tiny squash growing at the end and used in recipes along with full blossoms. Use the blossom of any variety of summer or winter squash in your favorite squash blossom recipe.
Use pruning shears or a sharp knife to cut squash blossoms at midday when the petals are open, leaving one inch of stem. Gently rinse in a pan of cool water and store in ice water in the refrigerator until ready to use. The flowers can be stored for a few hours or up to 1 or 2 days. If you’ve never eaten squash blossoms, you are in for a treat. A recipe for Stuffed Squash Blossoms is in the recipe portion of this section.
Nutritional Value
Because summer squash is immature, they are considerably lower in nutritional value than their winter counterparts. Generally, there is little variation in nutritional value between varieties. The peel is where many of the nutrients hide, so never peel summer squash.
Preparation & Serving
Summer squash can be grilled, steamed, boiled, sauteed, fried or used in stir fry recipes. They mix well with onions, tomatoes and okra in vegetable medleys. Summer squash can be used interchangeably in most recipes. Tinybaby squash can be used as appetizers, or left whole and sauteed with other vegetables.
Don’t waste male squash blossoms by leaving them in the garden. If you do not have the time or inclination to prepare them separately, toss them in the salad bowl or add to any squash preparation.
Cooking Seeds
Cooking summer squash seeds, like pumpkin seeds, are delicious.
Home Preservation
Canning is not recommended because the tender summer squash will simply turn to mush during processing, unless you are making pickles. Zucchini can be substituted for cucumbers in some pickle recipes. The results are especially good in your favorite recipes for Bread and Butter Pickles.
Blanch and freeze cubes or slices of summer squash or grate and freeze Zucchini, unblanched for making Zucchini bread. The best way to use over grown (10 to 12 inches) zucchini is to grate it and use in zucchini bread. Cut the squash in half lengthwise and cut away the seedy middle section. Wash, grate and freeze in one cup portions. Use zip closure freezer bags or rigid freezer containers leaving 1/2 inch head space. Over size zucchini can also be used to make canned zucchini chutney. The over 12-inch monsters should go on the compost heap.
***